Monday, August 3, 2015

St. Patrick's Day

Craft: Rainbow Bracelets
Before the program, we created individual bags containing three beads of each color (red, orange, yellow, green, blue, purple).   This made sure we had enough beads for each child.  At this station, each child chose the color of their base pipe cleaner and then threaded the beads onto it.  We then twisted the ends together and tucked them inside the beads.


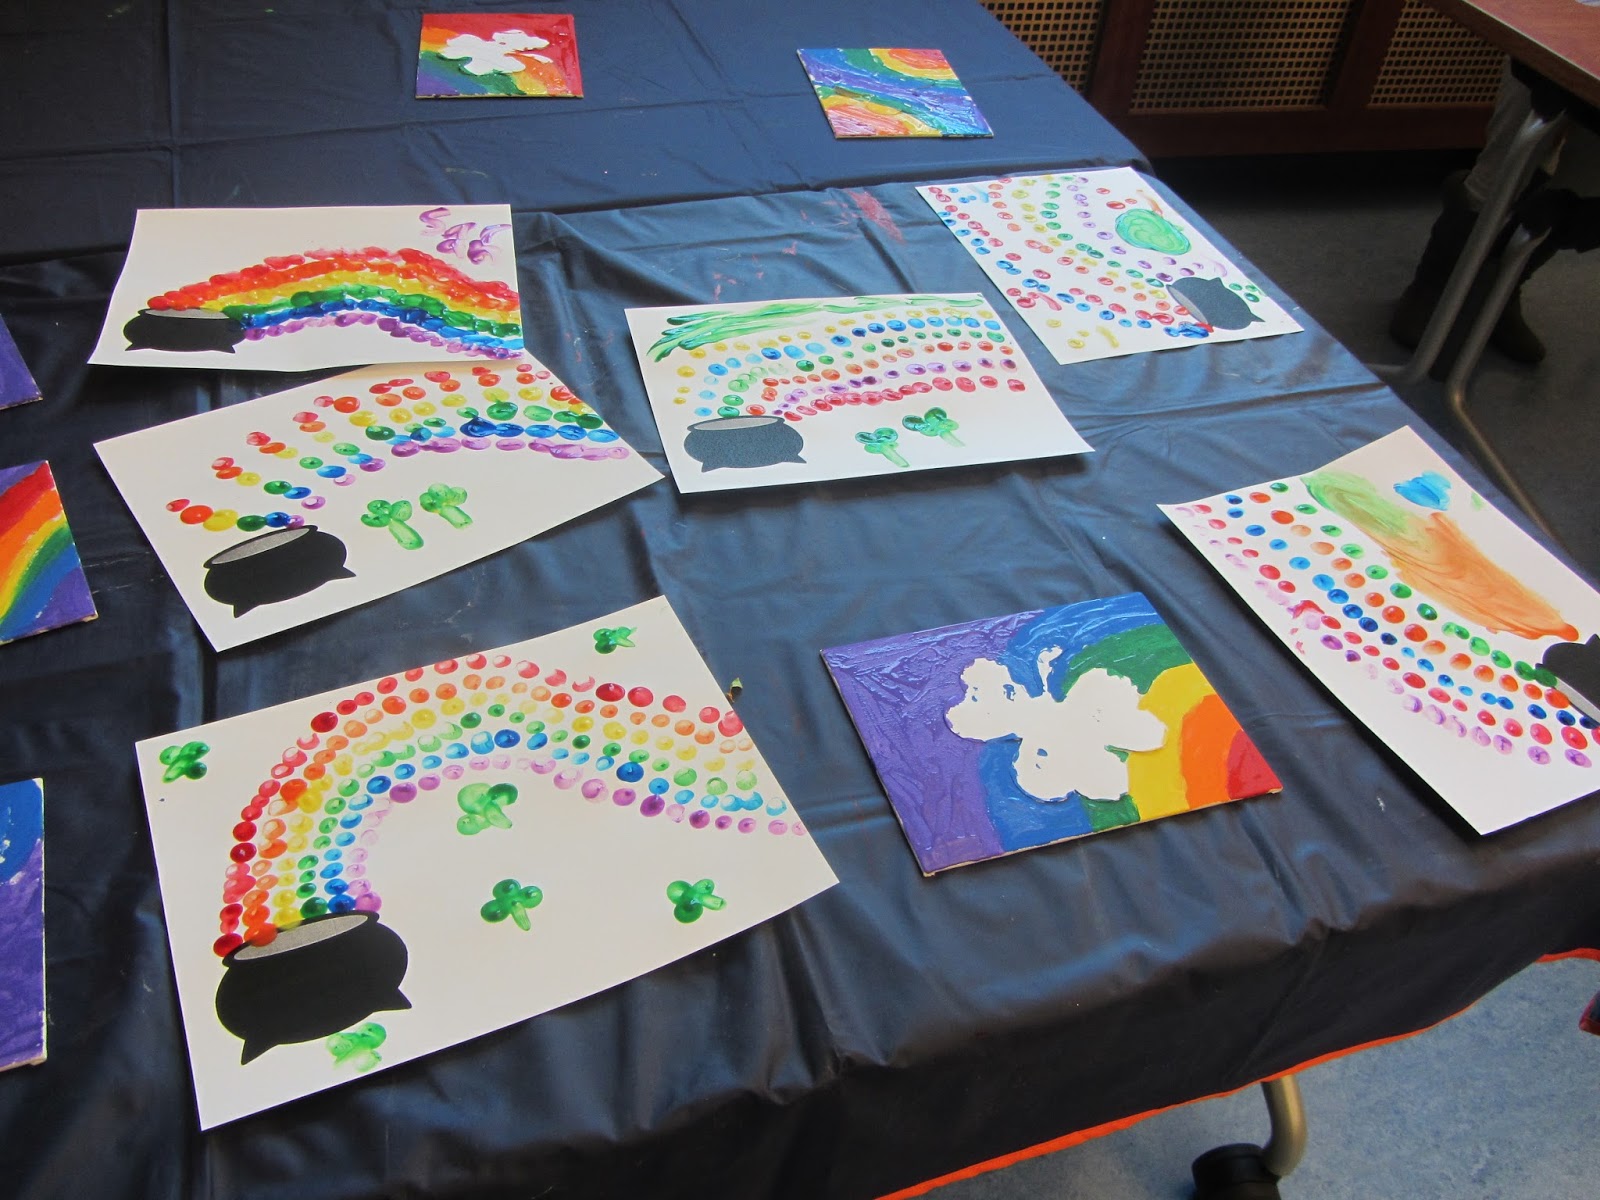
Craft: Shamrock Resist Rainbow Art
We prepped the canvas boards by sticking a card stock shamrock die cut to the canvas using blue painters tape.  Then, the kids used acrylic paint in rainbow colors, covering the boards.  When the shamrock was removed, it left a clear image behind.


Craft: Shamrock Rainbow Art
We taped a green construction paper shamrock to a piece of paper.  The kids used the colors of the rainbow to trace around the shamrock, making a rainbow pattern.

Our sample.


I love the originality!
Craft: Pot of Gold Fingerprint Rainbow
We located an image of a cauldron using Google Images, inserted it into a Microsoft Word document and printed it off on card stock.  The kids then used their fingers, dipped in tempera paint, to create the rainbow originating from the pot.
Using her finger as a brush.


Some got creative and added fingerprint shamrocks!

Game: Musical Shamrocks
We placed laminated shamrocks in a circle on the floor.  One of us sat in the middle to remove one of the shamrocks.  The other turned the music on and off.  The kids really liked playing this, although many of them walked ON the shamrocks instead of around them.

Attendance: 23, 12
Evaluation: This program was a request from the previous year.  We had a hard time finding age appropriate activities (many ideas are geared more towards preschoolers than the school age crowd).  However, it worked out really well and the kids liked all the art activities.  We also had a few books of Irish folktales for them to peruse if they finished early.
Reading!
Drying Artwork


Monday, July 27, 2015

How to Eat Fried Worms

We began this program by reading aloud the first chapter of How to Eat Fried Worms by Thomas Rockwell.


Next we showed the worm montage from the movie version, which can be found in the special feature section.  This is a hilarious montage of scenes of Billy eating worms in different ways.  The kids loved it and is has a wonderful gross-out factor.

Afterwards, the kids could choose from the following stations.

Craft: Beaded Worms


The kids folded their pipe cleaner in half, threaded beads onto the pipe cleaner, and ended with a larger wooden yellow bead.  They left enough of the pipe cleaner to make antennae.  With the sharpies, they added eyes and a mouth.

Science Activity/Craft: Worm Composting Bins
Composting station.  Rocks, sand, food and leaf scraps, soil, and worms


Dropping in her worm.

Adding soil
The kids began by adding a few rocks to the bottom of their prepared water bottle (lid cut off, duct tape around cut area to prevent cuts), a small layer of soil, a tablespoon of sand, some organic matter, a worm, more soil.  After their worm home was completed, they covered it with a piece of card stock, as worms prefer dark environments.  The card stock could be removed periodically to view the worm tunnels and see how the worm was doing.

This was super fun, although time consuming.  Many of them had fun choosing their worm and placing it inside its new home.  A few were a little squeamish, so we added the worm for them.

Craft: Worm Painting

The kids dipped yarn in paint and drizzled it on a piece of paper.  This turned out to be extremely messy, so we only had it available for the first session.


Attendance: 29, 12
Evaluation:  This was a lot of fun and the kids were fascinated by the worm houses.  While messy and time consuming, it was fun teaching them about the worms and how to care for them.  


Realm of the Renaissance

To introduce the subject, we began with a short video depicting the fresco technique used by Michaelangelo.  We had hoped to demonstrate how he made his colors, but didn't have all the necessary resources (pigments, egg yolks) or the time.

Video: Michaelangelo Fresco Technique


Craft: Fresco
Before the kids arrived we prepared Plaster of Paris surfaces for them to use.  This was time consuming and used up an entire container of Plaster of Paris.  We poured the plaster into small, square plates that had a defined edge.  We selected two different medallions for them to trace and then they used tempera paint to decorate their fresco.
Tracing the medallion
Defining the lines using pencil

Painting with tempera

Craft: Printing
At this station kids could use letter stamps and create a document similar to that done by a printing press.  They could also use the calligraphy pages to hand letter the same words, thereby comparing the two styles.  Most kids preferred the stamping!


Craft: Weapons of the Renaissance: Make Your Own Cannon
This craft came from: http://highhillhomeschool.blogspot.com/2014/10/weapons-of-renaissance-make-your-own.html.  It is an easy craft, requiring water bottles, corks, paper towels, baking soda and vinegar.

First the kids taped small dowel rods to their bottles and added cardboard wheels.  Then, they inserted their gunpowder (a tablespoon of baking powder wrapped up in a small piece of paper towel) followed by 1/2 cup of vinegar.  The cannon ball (cork) was inserted into the bottle.  The kids gently swirled the vinegar in the bottle, placed the cannon on the floor pointing away from all kids and waited.

Unfortunately this AWESOME craft, was an epic fail!  It sounded so simple and when we tested one out worked so well.  However, it needs corks that did not have the corkscrew go all the way through.  If there were any corkscrew holes, the pressure couldn't build up enough to pop the cork out.  Also, many of the corks didn't fit snuggly into the bottles (they were way too loose), even though it did in our sample.  If you can find enough working parts, this would be an awesome and super fun addition to any STEAM program.  
Taping on the wheels

Testing the cannons

Patiently awaiting the cannons to fire.


Craft: Sistene Chapel Art
This was a huge hit with many of the kids.  We had a few boxes placed on their sides.  The kids could tape a piece of paper to the top, lay down on the floor and draw just like Michaelangelo did when he painted the Sistene Chapel.


Attendance: 29, 11
Evaluation: Overall this was a super fun program.  The frescos all turned out well and was something many of the kids had never done before, so it had a wow factor.  The cannons, although a failure, were still fun and when they worked, thrilled the kids.  They all went home and kept trying to make them work.  I definitely want to make them again, but will test every cork beforehand to make sure they will fit in the bottles and don't have holes in the ends that release the gas prematurely.


Thursday, March 5, 2015

Takeoffs and Landings

For this program the kids made all sorts of fun stuff: paper airplanes, parachutes, roto-copters and hot air balloons.
Paper Airplanes:
Using books to make paper airplanes
Testing planes
Skill Testing
 Roto-Copters:
These were cut out using an Accu-cut die onto card stock, construction paper and printer paper.  We didn't have time to test which weight of paper worked the best.


Hot Air Balloons:
We found the idea on this website and modified it for older kids and time.

We cut card stock into 1x6 inch strips.  The kids used tempera paint dabbers to decorate their strips.  Once done and dry, we punched holes on one end and connected the strips together using metal brads.  We also punched a hole on the other end and curved the ends up  into a balloon shape, adding an additional brad.  The kids cut yarn strings to attach a 1 1/2 x 4 inch basket to their balloon.


For some reason I don't have a picture of a finished balloon.  This is from the Sew Home Grown blog.  We did not make ours into mobiles.
Parachutes:
We cut 8 x 8 squares out of black plastic garbage bags, tissue paper, and regular grocery sacks.  We punched holes in the four corners.  (To make it easier for the hole punch to work on the plastic, we taped the corners on some and added round stickers to others).  We also cut four equidistant holes on coffee filters. The kids picked one from the four options and cut lengths of yarn to tie on each corner.  We tied the ends together and let the kids test them using clothespins as weight.


Testing from the landing.
Black plastic bag parachute
It's hard to see, but these are roto-copters falling down.

Due to the large number of kids at our first session, we only did the testing from the landing during our smaller evening session.  The kids were well behaved and the patrons didn't seem to mind the items falling onto them.

Attendance: 30, 5
Evaluation: This program didn't go as planned in that I had hoped to do a lot of testing of the different materials to see if material weight made a difference in performance.  I think the program needs to be restructured in order for that to happen.  Each child would have to do the same project at the same time with testing following after creation.  That being said, the kids had a blast.  The hot air balloons required a lot of staff involvement when it came to assembling the balloons.  The younger kids also had a hard time tying the yarn to the parachutes and many didn't cut long enough strings.  With tweaking, a program to run again.